
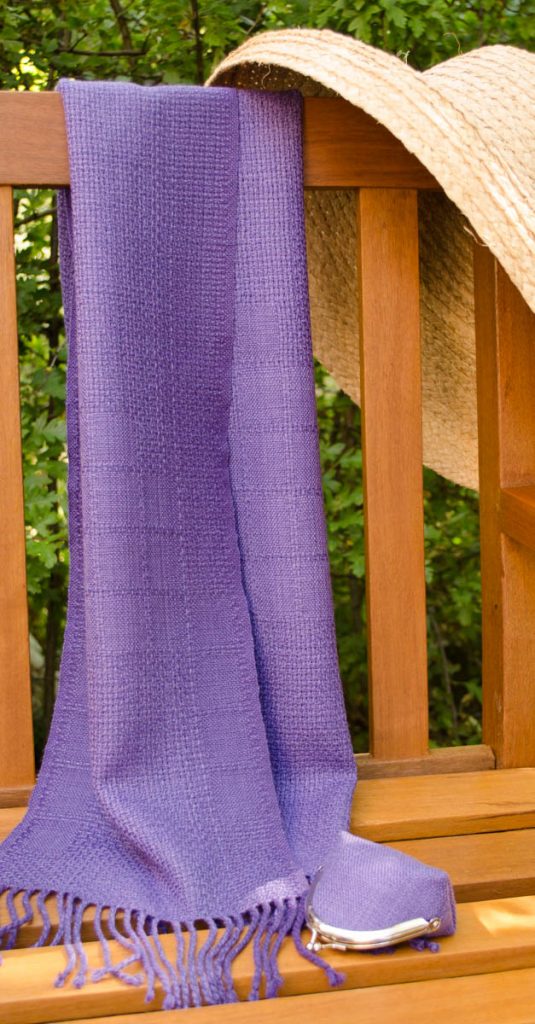
Planning a summer lace scarf: Part 3
In my previous post I talked about block designs and how we get from a sketch to profile draft. Now it is time to turn our profile draft into a threading draft so we can move our idea a step closer to the loom.
There are several ways to tackle this step from profile draft to threading draft. If you have a weaving software package such as Fiberworks, you can make use of the built-in tools and be done in seconds. However, if you want to understand the process, then it makes sense to learn to ‘do it by hand’ whether that is on paper or on your computer or tablet.
In this post I’m going to take an approach that suits me and my way of thinking about weaves, using lace as my example.
Obtaining the threading
Let’s start at the top of our simple window panes profile draft. We have two threading blocks A and B, and let’s say we have settled on the following pattern: 2 A blocks alternating with 5 B blocks.

We now need to choose a weave structure, and I am going to use our affordable summer friend, Bronson lace.
Unit weaves
Bronson lace is a unit weave. This is a term used to describe weave structures which are made up of small repeatable groups of threads: the minimum group of threads is called a unit. For each unit we will need both a threading and a lifting sequence, but we will start with the threading.
For Bronson lace the threading unit consists of six threads arranged 1-P-1-P-1-2:

P stands for ‘pattern shaft’ and will vary according the design we are creating. Three threads out of the six are threaded on shaft 1, two threads are on our pattern shaft and the last thread is on shaft 2.
Assigning shafts to blocks
To keep our blocks working independently, we need to assign one pattern shaft to each block in the profile draft. Let’s assign shaft 3 to block A and shaft 4 to block B. This choice is completely arbitrary.
Now we have two distinct threading units: 1-3-1-3-1-2 for block A and 1-4-1-4-1-2 for block B.

Substitution
We work along the profile threading, substituting one threading unit for each square in the profile draft.
The first two squares are block A, so we substitute two units of our threading for A.
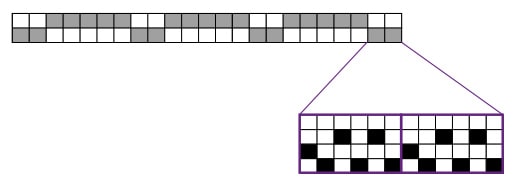
Then we have five squares of block B, so we substitute five units of our threading for B

And so on until we have a completed threading:

Yes, it really is as straightforward as that.
Design decision point!
Before we move to the next step, the time has come for us to commit! We are weaving a design in lace, but there are two distinctly different ways we can do this. The ‘active’ areas in our design – those we shaded in our profile draft – could be either areas of lace or areas of plain weave, and the remaining areas will be the other option.
When I wove my Highland Summer scarves, I placed my design as a motif at each end of the scarf. It was natural to choose plain weave as the ‘pattern’ and lace as the ‘background’ because this meant I would weave the main body of the scarf in lace rather than plain weave, creating the light summery feel that I wanted.

For the purposes of this example, I am going to develop that option. However, the alternative of a plain weave fabric with areas of lace pattern would be a perfectly reasonable choice in another context. Indeed, for more complex designs, what is ‘pattern’ and what is ‘ground’ becomes increasingly hard to define.
Using plain weave as an additional block
It’s worth stepping aside here to note that we can add a ‘bonus block’ to a lace design if we are happy that it should always be plain weave.
In Bronson lace, as in several structures, shafts 1 and 2 act as a plain weave base for the threading. If we thread some areas on just those two shafts, i.e. 1-2-1-2-1-2, then they will weave as plain weave no matter what pattern we use elsewhere.
If I had chosen to have a lace pattern on a plain weave ground, I could have woven my seven block design as a six block design.
I’ll address some of the practicalities of this plain weave bonus block next time.
Turning a profile draft into a liftplan
Now we can turn to the second dimension of our draft. We have obtained a threading which will allow us to operate two independent blocks. But what are the operations we will apply to those blocks to create our design?
One way to think about it is as another substitution exercise. We can identify the individual tie-up and treadling units for our structure the way we did for our threading and construct a complete draft.
However, taking this approach to the tie-up doesn’t always give you the clearest sense of what you are actually doing with the weave structure, so it’s worth dealing with this stage slightly differently. I’ll explain the way I think through the process and then return to substitution.
Starting with the structure
First of all: how does our chosen structure work?
With apologies to lace weaves everywhere, they are essentially plain weave with organised skips. That is, we would be weaving plain weave, but we choose to omit some of the interlacement where we want lace to form. We either leave a shaft down, where we would normally have raised it, or we raise a shaft where it would normally be left down. This interruption creates the floats which are characteristic of lace weaves.
To weave plain weave in Bronson lace we need two lifts. On one lift we raise just shaft 1, and on the other we raise all the other shafts. Alternating these two lifts will give us plain weave everywhere. Since there are six ends in each threading unit, six picks will also give us our treadling unit.

To interrupt this plain weave rhythm and create lace in a particular block, we identify the pattern shaft P for that block and leave it down for the second and fourth picks in the sequence. As our blocks work independently of each other, we can leave down as many of the pattern shafts as we choose for each treadling unit, creating lace in one or more blocks at a time. On these ‘lace-making lifts’ we always raise shaft 2 as this does the essential work of keeping our structure together.
 Leaving shaft 3 down creates lace in block A, plain weave in block B
 Leaving shaft 4 down creates plain weave in block A, lace in block B
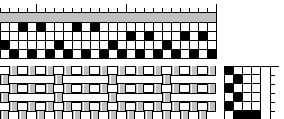 Leaving shafts 3 and 4 down creates lace in blocks A and B
Identifying our lifting blocks
Now we can go back to our profile draft and identify the lifts we need to make in order to achieve our pattern. We know that we will need the two plain weave lifts, so all that remains is to establish the pattern lifts that will give us lace in the places we want it.
Personally, I prefer to do this work in the liftplan rather than the tie-up. By doing all my thinking about the shafts first and then assigning my lifts to treadles, I am not forcing myself to multi-task!
In our window panes design we have two distinct lifting blocks. I want the first of these to create lace in both my threading blocks. That means I will need to leave both pattern shafts down on my lace-making lifts, raising only shaft 2.
I want the second block to create lace only in block A, which uses pattern shaft 3. I will need to leave shaft 3 down, but raise shafts 2 and 4 to maintain the plain weave in block B.
So altogether I need four distinct lifts to create this design.
- Raise shaft 1
- Raise shafts 2, 3 and 4
- Raise shaft 2
- Raise shafts 2 and 4
If I now write out a tie-up for four treadles, I have the following:
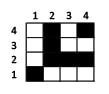
Now we can see that each six-pick treadling sequence will have a similar rhythm to the threading sequence 1-P-1-P-1-2, where 1 and 2 are now the first and second tabby treadles, and P is the relevant pattern treadle.

Zooming into the pattern part of the tie-up (at the top right) I can also see the image of my profile tie-up. If I were to ‘change faces’ here, i.e. raise the opposite set of shafts, I can easily change my design from plain-on-lace to lace-on-plain.

Substitution revisited
These two observations tell us how we can use substitution to generate our tie-up and treadling directly from the profile draft.
Step 1: We create the tie-up by first putting the plain weave treadles in place.

Step 2: Then we add as many pattern treadles as we need for our profile tie-up. We need to tie up shaft 2 to all of these pattern treadles to maintain the integrity of our weave.
Step 3: Then we insert our profile tie-up into the remaining blank area, taking care to choose the face which gives us the balance of plain weave and lace we want.
To derive the treadling we apply a substitution exactly like the one we used for the threading. Every square in the treadling becomes a sequence of six picks following the 1-P-1-P-1-2 rhythm which corresponds to that block.

Our finished thread-by-thread draft
I have only shown a small portion of the threading and treadling as we work through this logic, as the entire draft has now become quite large. But if we step back and take in the whole of it, we can see our block design coming through quite clearly. Here it is in both flavours.


More blocks, more shafts, more structures
I’ve shared a detailed step-by-step process for a relatively simple design interpreted in a single structure. I’m sure you can sense how many more possibilties there are that I haven’t been able to explore in this post.
- We could take the same design and apply a completely different structure
- We could use the same structure but apply it to a different profile draft
- We can extend our existing design by introducing variations that will require more shafts, such as the ‘alternating windows’ profile I shared last time.
Homework idea!
If you want to test your understanding of this process, I suggest the alternating windows design as a place to start. In my previous post I developed the profile threading, so the first step will be to use the second part of the block design process to create the profile tie-up and treadling. Once you have done that, you can compare your profile draft to mine, which is here.
The next step will be to turn that alternating windows profile into a threading draft in Bronson lace using the process described above. I will hide the complete thread-by-thread draft here.
If you’re wanting a greater challenge, why not work with some of the Highland Summer design variations I shared in my last post?
The original Highland Summer scarves were woven in huck lace and needed 16 shafts. I have taken the profile draft for the North of Scotland, which needs the smallest number of blocks, and interpreted it in Bronson lace for 8 shafts. You’ll find a revised profile draft here and the threading draft is downloadable as a .wif file here (you may have to wait a minute for the download button to appear).
What’s coming up next?
You may have noticed how dramatically our little profile draft expanded when we turned it into a threading draft. In my final post of this series I am going to look at some of the practicalities of planning a summer lace project, and scale is one of the topics I’ll discuss.
In the meantime, happy weaving!
First posted on weavingspace.co.uk © Cally Booker

Thank you so much for this post. It really helps my understanding of block weave. You are a generous teacher.
I’m really glad it’s useful, Maureen. Happy Weaving!
This is great Cally. I’ve always understood profile threading, but this is the first thing I’ve seen that got me to understand profile treadling. I was looking at some old drafts that just said ‘treadling is clear from the profile draft’. Maybe now it will be!
I hope it will help, Martha! Really glad to hear that the post has been useful.
Thank you for such clear and understandable explainations, I finally get it! 😀