
Planning a summer lace scarf: Part 4
So far in this series we’ve looked at ideas for design inspiration and the principles for working with block designs. But how do we actually get this scarf on the loom and weave it? There are a few practical points to think about which are topic of this final instalment.
Fibre
We may typically think of linen or cotton as the appropriate material for summer lace. These are lovely options, but by no means the only ones. My Highland Summer scarves are woven in a blend of merino and silk, and either of these fibres would make a fabulous solo performance as well.
I could carry on listing different fibres – I’ve used alpaca for lace many times, for instance – but the point is really to say that you don’t need an approved list of suitable fibres. If you like a particular fibre, why not try using it for lace?
There are some practical implications of your yarn choice, particularly with respect to sett and beat, and I will look at these below. Overall, the main consideration to bear in mind is that a light, lacy feel will not be achieved with a chunky yarn. Your perceptions of light and lacy are your own, of course, but my personal preference would be to look for a yarn that yields 8000 or more metres per kilo (2/16 Nm or finer).
Planning and scale
As I may have said a few times already… design is not a linear process. One of the challenges with weave design is that everything depends on everything else. Your loom is the place where your purpose, yarn, structure, and colour choices meet, so which of these do you tackle first?
Ultimately, it doesn’t matter. You start wherever you are able to start, but – as I described in detail in part two – you need to be open to negotiating with your own ideas. In this section, I’ll consider the negotiation between yarn and design in the context of scale.
How big is a scarf anyway?
Whatever we set out to weave, we usually have an idea of how big that thing should be. If not, then we need to do some thinking and get ourselves just such an idea.
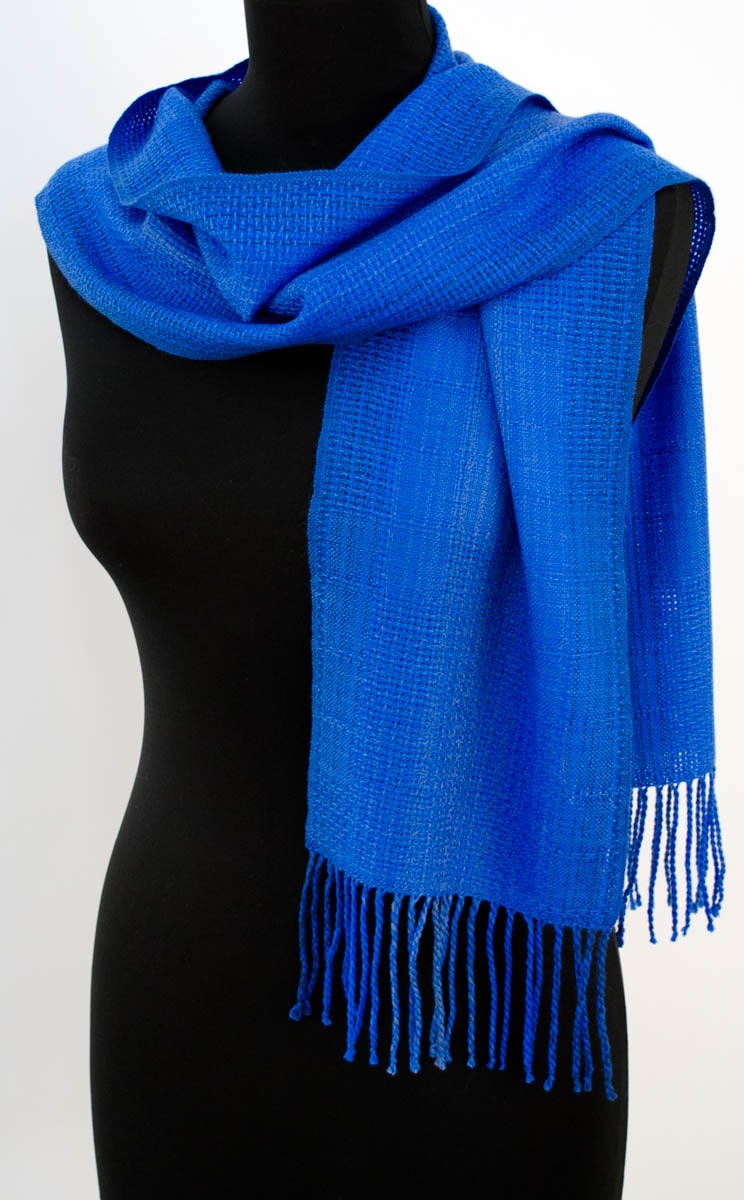
In my head a scarf is a textile which is considerably longer than it is wide. The finished width would usually be 8 to 10 inches (20 to 25 cm) but I’ll still call it a scarf if it lies in the 7 – 14” territory (18 – 35 cm). If it gets much wider than that, it is heading into the ‘over-sized’ or even the wrap zone. The finished length could be anything over 60 inches (150 cm).
You may have completely different ideas about what constitutes a scarf, and that is absolutely fine. The point is not to reach a universal consensus, but to conjure up for yourself a clear and specific vision of the thing you are aiming for.
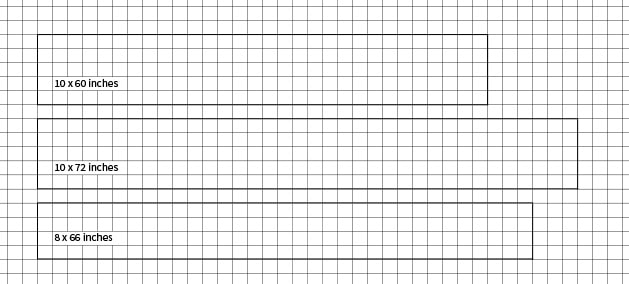
As before, squared paper is your friend. We can quickly get a sense of what different sizes and proportions look like by making a few little scale drawings.
Hold that thought, while we turn back to yarn.
Yarn and sett
You may already have a yarn in mind, in which case you are just a short step away from having a sett in mind.
Lace is often woven with an open sett, wider than plain weave. If you look at a resource such as Handwoven magazine’s Master Yarn Chart you will see three different setts given for each yarn: the smallest of these three numbers is the sett for lace. However, some weavers favour using the plain weave sett and letting the skips take take care of the lace-making.
All the yarn I use for scarves contains a certain amount of wool or other animal fibre such as alpaca. This means it is a little ‘grabbier’ than some yarns, and an open sett for lace works well for me. It gives me the open, lacy look I want without becoming sleazy. If you are weaving your lace scarf in something more slippery, such as Tencel or silk, than it makes sense to set it closer to plain weave.
There is no substitute for sampling. If you commit to sample, then you just need a place to start. Choose a plain weave sett, a lace sett, or something in between. You can adjust in response to what you find as you weave.
But that’s still to come. The first step is just to look at that starting number, and at your sketch, and get an idea of how many ends there would be in a lace scarf. To make my Highland summer scarves I used two strands of 2/64 merino silk wound together for each warp end. Having ‘made up’ a non-standard yarn, I wove some samples to discover what sett would achieve the vision of lace I carried in my head. I ended up with 196 ends set at 20 epi to achieve just under 10 inches width in the reed.
The negotiation
We now have a three-way negotiation to conduct: between our yarn, our block design and the size of our finished scarf. It doesn’t matter which one of these is our starting point, but if any one of them is a ‘given’ – I’m using this yarn and nobody can stop me! – then that’s clearly the place to begin.

Let’s work through this negotiation with our window panes draft from part three, my yarn and sett of 20 epi, and the idea that a scarf should be 8 – 10 inches wide.

Prioritising the yarn
At 20 epi, something near to 200 ends would give me 10 inches in the reed. If I start with 10 inches in the reed then I will end up with a scarf of the right kind of width.
But my window panes draft only has 138 ends. It will be much too skinny for my idea of a scarf, so I need to make some adjustment.
Below I will consider some ways to re-scale the design: the point here is to note that it will be necessary to do that to meet my yarn and size requirements.
Prioritising the design
My draft has 138 ends and I am committed to it. If I want to get 10” width in the reed then I would need a sett of about 14 epi.
That is going to call for a chunkier yarn than I had in mind. How does that sit with my ideas about a light and lacy scarf?
The best way forward might be to compromise on my idea about the scarf width. An 8/2 cotton yarn set at 16 epi would yield 8.6 inches in the reed. I would need to sample to know exactly what finished width I’d get, but it seems likely to be in the 7.5 – 8 inch range. That wouldn’t be my ideal, but it is OK and it would just about satisfy my sense of laciness.
It’s worth pausing to note that this is a tricky place to work from: to be committed to using a draft without modification. My end goal is a lacy scarf, and I have had to adjust my ideas both about scarves and about laciness!
Prioritising the finished size
If this is mission-critical then you’ll need to sample. That’s my last word on the subject, so no excuses please! Once you have done that, you’ll know the sett you need for your yarn and can negotiate with the design from there.
Scaling your design
There are several options here and we can call on these at any point in the design process. As you ponder your profile draft and consider how you might turn it into a threading draft, give some thought to the scale you want to end up with.
Matching blocks to units
In our substitution process we assigned one unit of the bronson lace structure to each square in the profile draft. However, we could have assigned two units to each square, or three or more.
Substituting two units per square instead of one would double our total number of warp ends. In this case that would yield 138 x 2 = 276 ends. That would make the design a bit bigger than my ideal, so may not be the best solution.
Add or subtract pattern blocks
With a pattern like the window panes, it is easy to see how we can add or subtract repeats of our basic block design.
Each window pane in our profile draft consisted of five squares and each frame of two squares. Adding seven more squares at six ends per square would yield 42 more ends. 138 + 42 = 180 ends. That would give me 9 inches in the reed, which is not exactly on target but would likely yield a scarf within my 8 – 10 inch zone, particularly if I add a selvedge as described below.
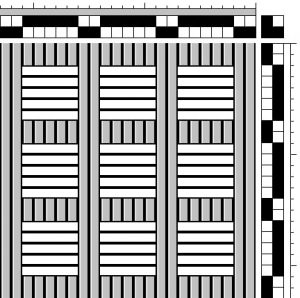 Our original profile draft
 Revised profile draft
If I want to keep my design as a square, I will need to add an extra repeat into the lifting profile as well. My thread-by-thread draft now looks like this:

Adjust the ratio of my pattern blocks
I settled on the 5:2 ratio of window pane to frame because it was visually appealing. However, I might be able to adjust that slightly to get a better result from the substitution process while still achieving the look that I like.
If I doubled the number of squares in my sketch to 10:4 then (as described in ‘matching blocks to units’ above) substitution would yield too many ends. Perhaps I can find something in between 5:2 and 10:4 that will work. What about 8:3?

The shortcut to thinking this through is to bear in mind the overall width of our design. My original window panes profile threading has 2 + 5 + 2 + 5 + 2 + 5 + 2 = 23 squares in total. In our substitution process each of those 23 squares became 6 threads, yielding 23 x 6 = 138 ends.
If we know the structure and yarn we want to use then we can actually apply that information to work backwards from the desired width*: 200 ends doesn’t divide exactly by 6, but doing the calculation 200/6 tells me that I need to be in the ballpark of 32 – 34 squares for my design to become a ten-inch-wide scarf warp.
If my window panes are 8 squares each, then that will take 24 squares. The frames of 3 squares each would add another 12 squares, making the design 36 squares across. 36 x 6 = 216 ends, a little wider than my 10 inches, but close enough to be a reasonable option.

There is no right answer to this design decision. It’s a weighing up of options based on your personal priorities. If you don’t know what your priorities are, then thinking through the options should help to clarify them!
* In practice, this is typically the way I match my design ideas to the finished item I want to end up with.
The plain weave bonus block
I mentioned that my scarves had 196 ends. This is not a multiple of 6, or even of 3 (I used a 3-end huck for my original design). In fact 10 of those ends were for the selvedges: 5 ends on each side.
A plain weave selvedge is a real asset when you are weaving lace. It provides a nice stable edge and you don’t have to worry about your floats becoming messy. I’ve already mentioned the plain weave bonus block: you don’t need any extra shafts to create this selvedge, which can be threaded alternately on shafts 1 and 2.

However, plain weave takes up the warp much more quickly than lace, due to its frequent interlacement. If you do use the bonus block, whether at the selvedge or anywhere else in your design, this is a hazard to watch out for.
At the selvedge you can deal with it easily by winding and weighting this part of the warp separately. In the middle of your design it is more challenging. The simplest way to avoid the problem of uneven take-up is to restrict your use of the bonus block to the edge of your warp.
In general, your design will weave more comfortably if you have a rough balance between plain weave and lace over the warp as a whole. If you are absolutely determined to have vertical stripes of lace and plain weave, then however you thread them, you will need two separately weighted warps to achieve this. Otherwise the plain weave sections will tighten up, and the misery of snapped warp ends and an unmanageable shed will rapidly overtake you.
Beating lace
‘Beating’ is the wrong word here! I weave a lot of twills, and the switch from twill to lace always catches me out. I need a warm-up sample just to re-learn the gentle placement of the weft that is more suited to a lace weave.
The open sett and long floats of a lace weave are both hearty invitations to the weft to pack down easily, and yet a packed down weft is exactly what you don’t want for lacy structure. What you are aiming for is a square weave: your ppi should match your epi.
In practice, you may find it easiest to achieve this by focusing on the plain weave parts of the design. Don’t worry about the lace picks drifting together, because they will inevitably do this. If your design calls for lace all the way across the warp then use the plain weave picks which punctuate the units to determine the spacing.
Say that you are weaving Bronson lace with a sett of 24 epi. Each 6-end threading unit, and hence each 6-pick treadling unit, should occupy a quarter of an inch. As long as the last pick in the unit is a quarter of an inch from the last pick in the previous unit, then it doesn’t matter that the picks in between have already moved into ‘lace position’. They will do this anyway when you wet finish the cloth.
Once you have got into the rhythm of your lace beat, you’ll be delighted at how speedily it weaves up. All that space!
End treatments
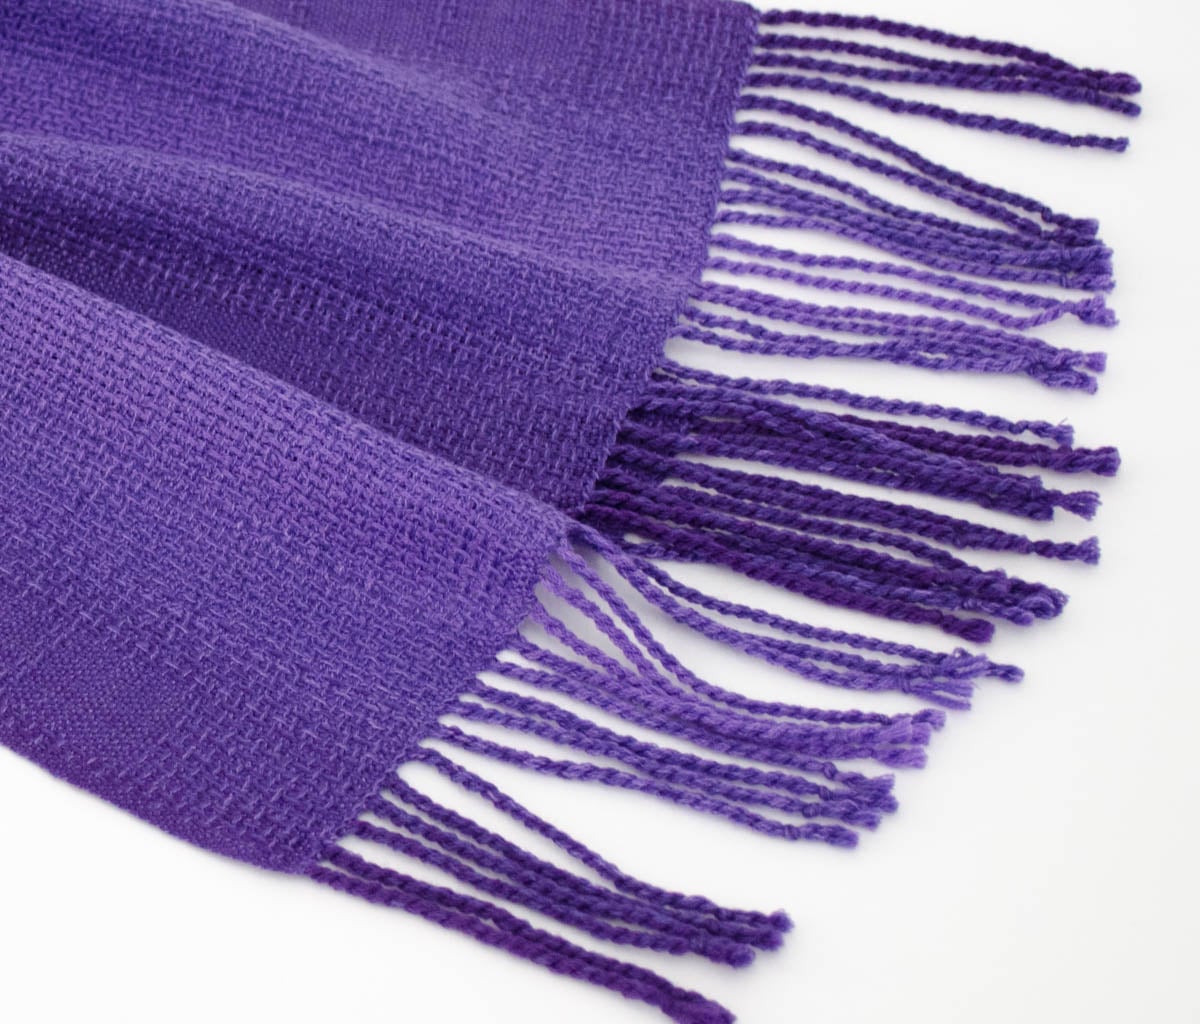
As plain weave is so compatible with lace, you have lots of options for creating interesting border designs at the beginning and end of a lace scarf. As my Highland Summer motifs were designed to sit at the ends of the scarf, I chose the very simple treatment of a short band of plain weave. A couple of picks of plain weave are also a good basis for hem-stitching. As the warp is open, the fringe on a lace weave scarf can appear quite sparse, but a purposeful finish with hem-stitching and twisted fringes turns ‘sparse’ into ‘intentionally delicate’.
It makes sense to hem-stitch in groups which correspond to your threading units, as this will give you a visible guide (after you have woven a few inches).

Finishing
The transformation of wet finishing is always exciting, but lace delivers an extra thrill. When they are immersed, the floats in the weave will slip easily and naturally into their lace formation, and the cloth you lift out of the water will suddenly reveal your design in all its glory. I love this bit!
Be firm with your pressing to lock in that lace. It will do wonders for the drape as well.
And you’re done.

First posted on weavingspace.co.uk © Cally Booker