Let’s say we have threaded up our looms for double weave blocks on 8 shafts. How do we set about weaving them? In this post I will cover two basic liftplans which allow us to weave checkerboard style patterns. Examining the logic of these liftplans will also give us the basis for further design options.
Layer exchange
First I’m going to take a step back from the blocks and look at how we create and exchange layers on 8 shafts. The principles are exactly the same as on 4 shafts: you can remind yourself of those here. I’m also going to use the same key in my drafts:

The difference is that to weave a single layer, we now have four shafts to deal with. Our threading, described in this post, looks like this:
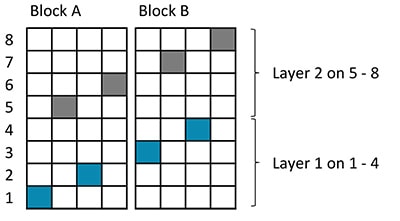
Layer 1 is threaded on shafts 1-4, so to weave it we need to alternate lifting shafts 1 & 3 with shafts 2 & 4. Hey, that sounds familiar! Yes, now we have four shafts for this layer, we are weaving it as if it were single cloth threaded on those four shafts. The same result is achieved for layer 2 by lifting shafts 5 & 7 alternately with shafts 6 & 8. These four lifts create our two layers.
The other thing we need to think about is which layer will be on top. As before, if we want layer 1 (the blue layer) on top, we need to make sure we lift it out of the way when we are weaving layer 2.

And if we want layer 2 on top, we need to lift that layer out of the way when we are weaving layer 1.

It’s worth pausing a moment here to note that the shafts which are lifted to weave (marked with a circle) are the same in both liftplans. The only differences are which shafts are marked with an X. As long as our design keeps each layer distinct and woven with its own weft – which, for now, is exactly what we will do – all our liftplans will be constructed around the same basic skeleton:
Do you want to understand double weave?
My online workshop has helped hundreds of weavers to master block double weave on an 8-shaft loom.
Thinking about blocks
Designing with blocks is a much bigger topic than I can cover as an ‘aside’ in this post! It is an important topic, however, and this series of posts goes into it in some detail.
For the purposes of our excursions in double weave, I will highlight two steps I find useful.
Profile draft
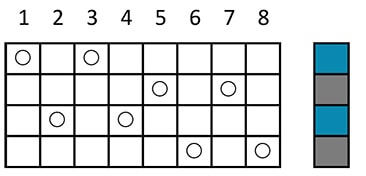
Step one is to sketch out a profile draft. This is essentially the ‘distance view’ of your woven fabric. Imagine that you are looking across a room at a lovely textile hanging on the opposite wall. Before you get close enough to see the interlacement, you get a sense of the overall pattern. In this case, our imaginary textile has a checkerboard design, like this:

To create this design using double weave, we need to take several things into account. We can see it takes two blocks, as each horizontal row has two distinctly different looking areas: a blue area and a grey area. To achieve this, we will need to weave the blue warp layer with a blue weft and the grey warp layer with a grey weft. We will also need to find a way of raising the blue layer to the surface of the cloth in one block, while raising the grey layer to the surface in the other block. And we need to do this in two different ways, so that in the top row we obtain grey-blue-grey-blue and in the next row we get blue-grey-blue-grey.
Lift-planning
Step two is to connect what we want to see in the cloth with the threading we have already designed. This allows us to plan the lift combinations we will need. In my drafts above I have used Xs to raise the top layer out of the way, so let’s mark up our threading with Xs to illustrate this.
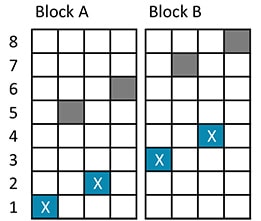
The diagram above shows how I might think about liftplan 1: the blue threads in both blocks are marked with Xs to show that these are the threads I want on the face of the cloth. Whenever I weave the grey layer, therefore, I enter Xs into the liftplan for these shafts to raise them up to the top.
Turning the idea into a set of lifts
The top row of my profile draft shows the blue layer on top in block A and the grey layer on top in block B. I can mark up my threading to show this:

Now we go back to the skeleton liftplan we created above.
The Xs in block A are on shafts 1 & 2, the blue warp ends. We need to lift these out of the way (keeping them on the face of the cloth) whenever we are weaving the grey layer.

The Xs in block B are on shafts 7 & 8, the grey warp ends. We need to lift these out of the way whenever we are weaving the blue layer. Altogether, then, our liftplan looks like this:

These four lifts make the sequence we need to achieve the first row of our profile draft. We can repeat it as many times as we want in order to create squares or rectangles of colour across the cloth.
For the second row of our profile draft, we can use exactly the same reasoning process. This row requires grey on the face of the cloth in block A and blue in block B. Marked up on our threading it looks like this…
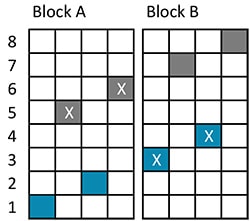
…which leads us to the following liftplan:

The most important thing to note about the final liftplans is that the two requirements of ‘weaving a layer’ and ‘lifting it out of the way’ belong to different picks. When we are weaving the blue layer, it is the grey layer we need to lift. When we are weaving the grey layer, it is the blue layer we need to lift. Every pick acts on both layers of our double cloth.
Tie-ups
The approach I have taken to developing the liftplans above gives you a strong hint about the way we might tie up a floor loom efficiently to weave blocks.
If you just want to alternate liftplans 3 and 4, you can tie up eight treadles exactly as shown: one treadle for each lift combination.
However, if you want more flexibility, then you can separate out the two aspects of double weave. You can tie up four treadles to weave the skeleton liftplan (1 & 3, 2 & 4, 5 & 7, 6 & 8) and then tie up other treadles to raise the different blocks. For 8 shafts and 10 treadles, this is a useful tie-up:

The four liftplans can then be converted into the following four treadlings. In each case, the ‘weaving’ treadles are combined with one or more ‘lifting out of the way’ treadles to make the sequence complete.

Design possibilities
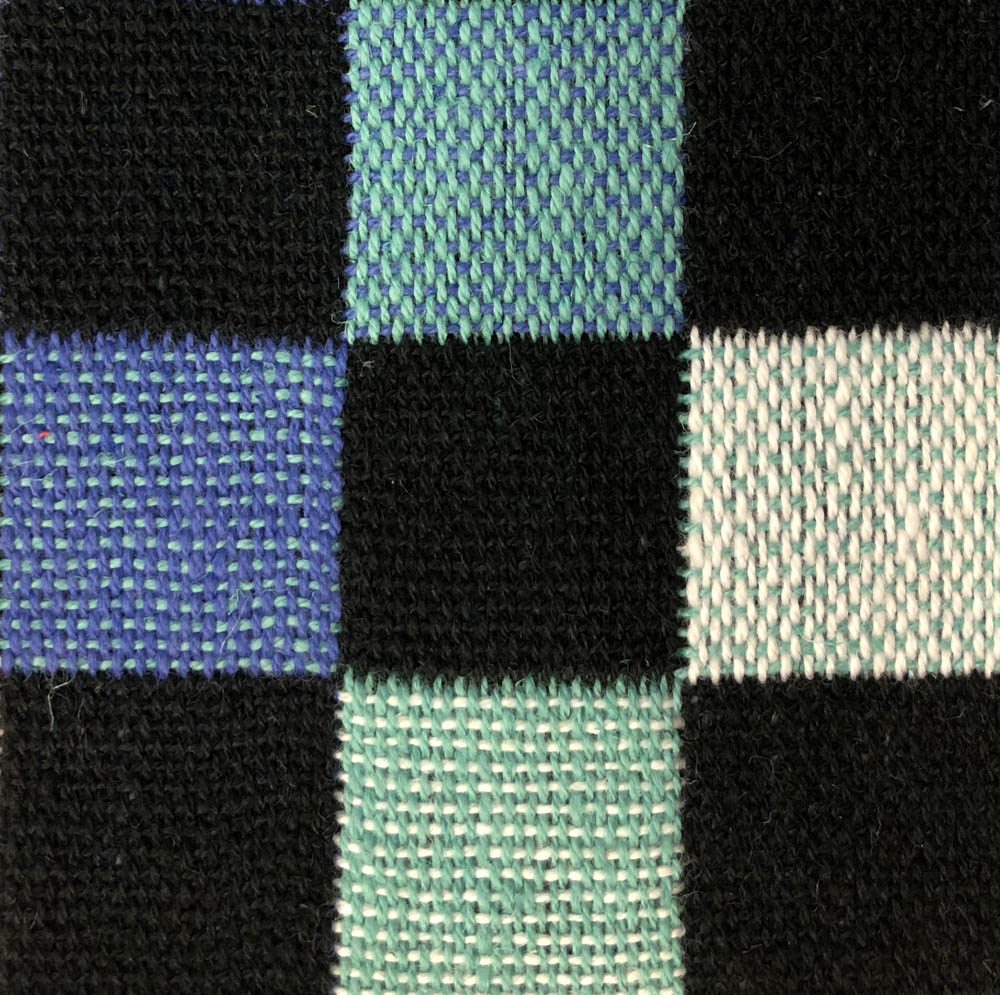
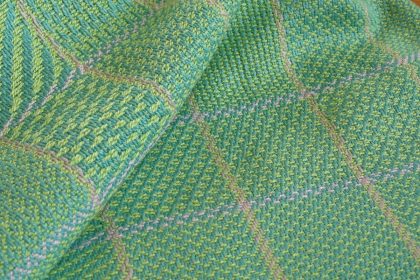
I have worked through this example with just two colours, blue and grey. However, the sample I photographed at the top of this post is not quite as simple. One layer is solid black, but the ‘blue’ layer consists of stripes of blue, white and turquoise in both warp and weft. The liftplans I used are those shown here, but the colour variation makes it appear as though something more complex is going on.
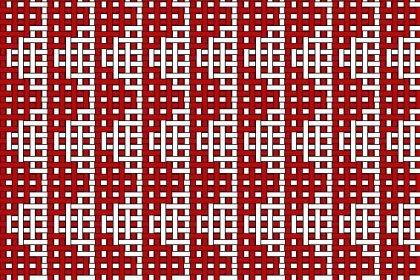
In my last post I also shared a sample with uneven block sizes:

This sample is also woven using the pair of liftplans given above, but the effect is quite different. Again, there is a ‘blue’ layer, but it is not a solid blue. Several different shades of blue and purple are used in both warp and weft. The ‘orange’ layer uses several different shades of orange and yellow.
In both of these samples, the stripes are aligned with the blocks. That is, when a colour change is made in warp or weft, the threading or the liftplan also changes. That doesn’t have to be the case, though. A colour change could take place half-way across a threading block, for instance. Once you have the principle in your head, the design possibilities are endless.
Coming up…
We’re going to stay with blocks for a while yet! There are several different ways of varying the combinations of shafts and lifts and we will examine some of these to create more design options.
First posted on weavingspace.co.uk © Cally Booker


Thankyou so much Cally for making this available. I’ve been studying your double weave posts for weeks now and making little steps to understanding. Today I produced my first double weave blocks. I am so excited. This has been my weaving dream since I started 18 months ago.
😀
That is exciting, Jane, well done! I’m really delighted that these posts have helped you to achieve your dream.
Hi Cally. Hope all is well with you. Just been browsing your pages again and reading over the guidance on doubleweave blocks. I was just speaking about this very subject yesterday with my daugher coincidentally and was interested in using multiple colour of blocks such as you described..Am on a mission with deflected double weave presently and a bit of overshot on tha Ashfors table look which I started due to the necessary cancellation of the April class. So am keeping busy. Thank goodness for weaving. Kind regards irene Anderson.
It’s amazing how often double weave blocks come up in conversation! I’m glad you have plenty of weaving on the go. We’re fortunate to have such an absorbing craft!