
If you are weaving double cloth on a floor loom then this post is for you. Last time we looked at liftplans, which are ideal for getting a sense of what is going on in the double weave process. Any of these individual liftplans could be implemented as a 4-treadle tie-up as well. You’ll have noticed, though, that there were several different options, even though the discussion was limited to one aspect of making double cloth: the creation and exchange of separate layers. How do you tie up the treadles to make it as easy as possible to access these options?
A 4-treadle skeleton tie-up
For a 4-shaft jack loom, the simplest tie-up option is to assign one shaft to one treadle so that each pair of treadles controls one layer. You can do this in a variety of ways and it works equally well for either the straight or the parallel threading. You will need to use both feet for treadling, and my personal preference is to give my left foot the task of managing layer one, while my right foot operates layer two.
For rising shafts
The draft on the left shows the parallel threading and a corresponding four-treadle tie-up; the draft on the right uses the straight threading. I have coloured in the squares which indicate where a shaft is tied to a treadle. The shaft assignment is different, but once the tie-up is made they are functionally interchangeable. We can use exactly the same treadlings for either option.
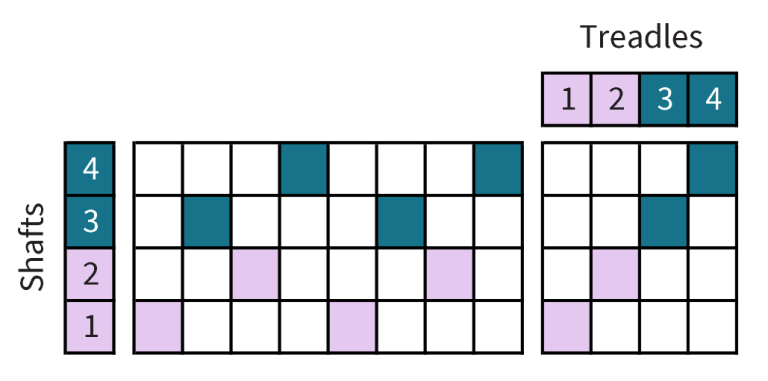
Tie-up for a parallel threading 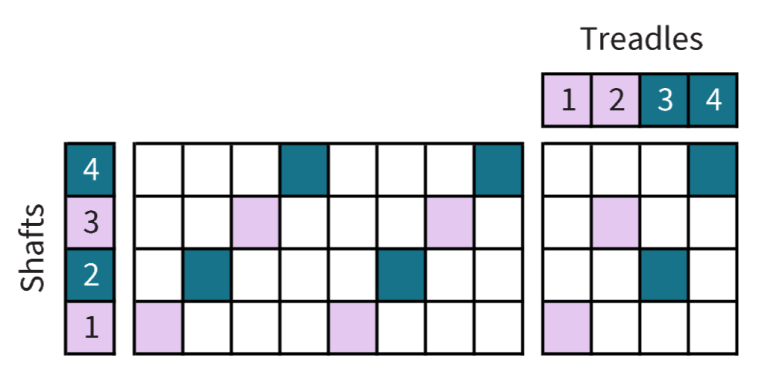
Tie-up for a straight treadling
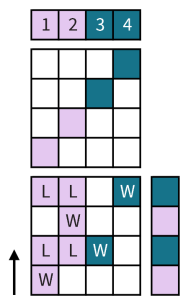
In fact the treadling on either of these tie-ups looks identical to the liftplans we considered previously. I am even going to use the same letter code to indicate what is going on, although it may help to modify the key slightly to reflect the different action:

And the treadling sequences, like the liftplans, should be read from the bottom up, so in the example below we are starting with treadle one to raise shaft one. By alternating pink and teal picks, I am keeping the two layers growing at the same rate, and by activating both the layer one treadles on picks two and four, I am keeping layer one – my pink layer – on the face of the cloth.
For sinking shafts
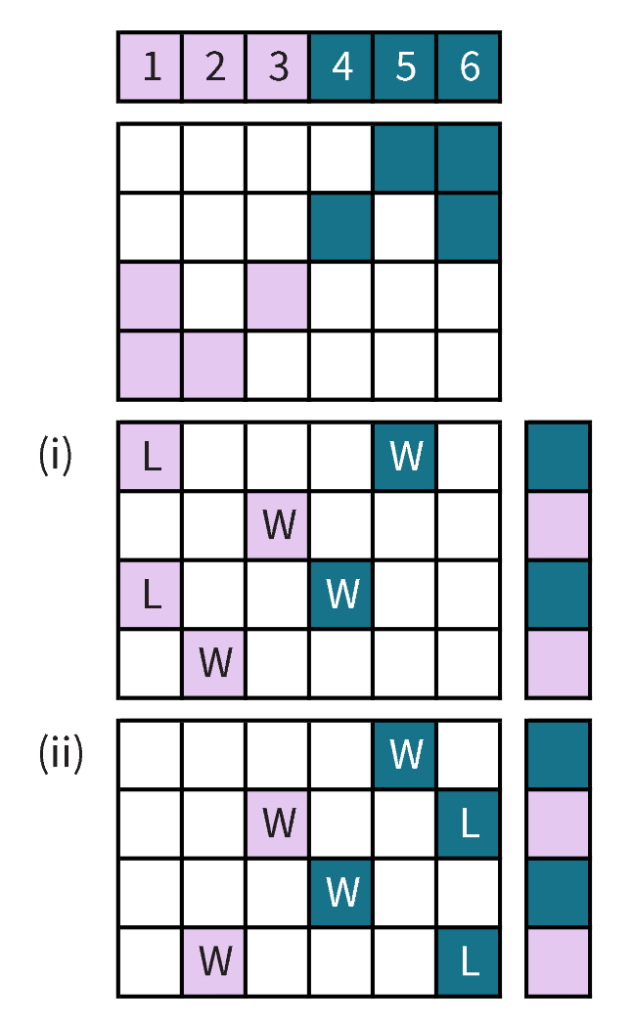
The essential symmetry of double cloth makes it very easy to adapt this approach for looms with sinking rather than rising shafts. In fact, we can use exactly the same tie-up and only need a very modest adjustment to the treadling. To avoid confusion, in the version for sinking shafts I have used an X to indicate the shaft-treadle connection.
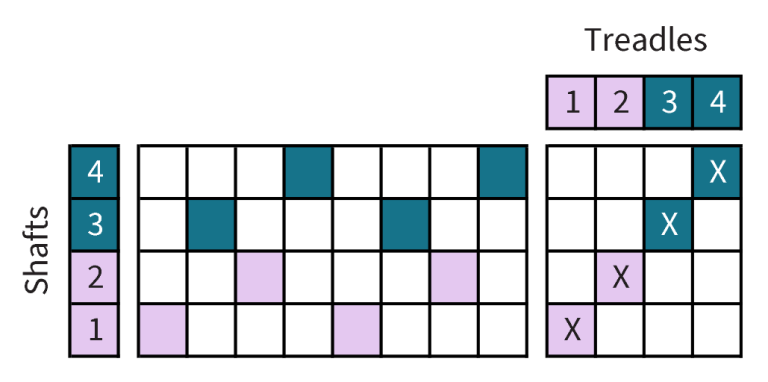
Here I have just shown the tie-up for the parallel threading, but the tie-up for the straight threading can also be ‘borrowed’ exactly as it is. The principle will be as described before: one treadle tied to one shaft, one layer assigned to each foot.
There are two ways in which we can modify the treadling, but to my mind only one of those is strictly necessary when we are making plain weave double cloth. Sticklers may want to look away now to avoid being offended! When making plain weave, we need to alternate the two plain weave sheds. When the two sheds are ‘odd’ and ‘even’ as they are with the parallel threading, then my default starting point is to open the odd shed and I am not terribly bothered whether that means raising the odd shaft or lowering it. So for the weaving (the ‘W’) part of the treadling, I would tend to stick to the same sequence as above: start with treadle one for layer one, then treadle three for layer two etc.
However, the layer-lifting action is mission critical and we do need to adapt that to fit the behaviour of the loom. When we are raising shafts to weave, the easiest layer to manage is the top layer; but we need to raise that layer out of the way to reach the lower layer. When we are lowering shafts to weave, the easiest layer to manage is the bottom layer. Now we need to lower that layer out of the way in order to reach the top layer. What that means in practice, is that we can use the exact same treadlings, but switch them over as their effect will be reversed.
Comparing the treadlings
The tie-up on the right is for rising shafts and on the left for sinking shafts. In both cases, the treadling marked (i) will put the light pink layer, layer one, on the face of the cloth, while the treadling marked (ii) will put the teal layer, layer two, on the face of the cloth.

Treadling for sinking shafts 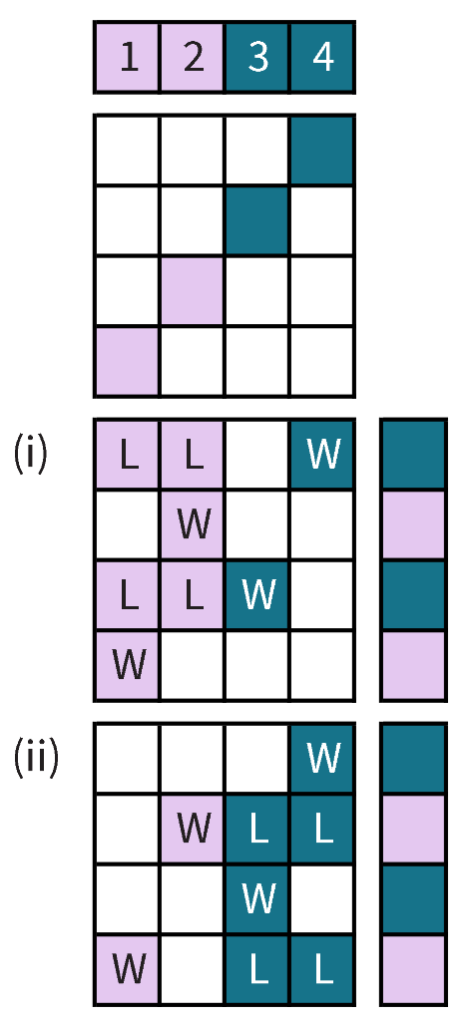
Treadling for rising shafts
6-treadle tie-up for a jack loom
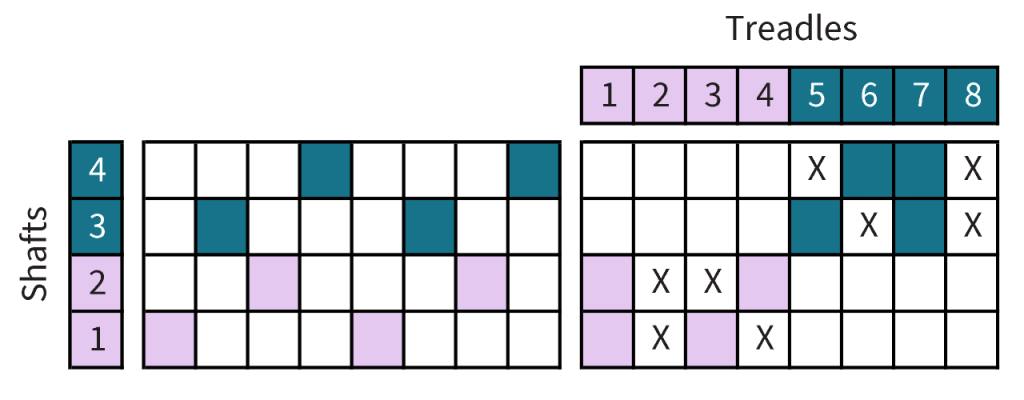
The four-treadle approach is extremely flexible, but it does mean that you are often going to be combining three treadles for a single lift. We can streamline it a little by adding two more treadles, each one tied to raise (or lower) the whole of a layer at one time. The four treadles in the centre each raise one shaft as before, so your basic treadling pattern will use these over and over (alternating left foot and right foot) to create the plain weave interlacement. However, whenever you are weaving the bottom layer, you can raise the top layer out of the way by using the opposite foot on the outermost treadle.
Again, this will work for looms with rising or with sinking shafts, and we can also use the same treadlings. Here the tie-up and treadlings are shown for rising shafts, so (i) puts layer one on top and (ii) puts layer two on top. Each treadling would have the opposite effect on a loom with sinking shafts.
This approach is great if you have a jack loom. However, if you have a countermarche loom it is not quite so easy to combine treadles. As every shaft needs to be tied either to rise or to sink, you need to make sure you have all the options covered while also avoiding ‘clashes’ where a shaft is being pulled in two directions at once. It’s a more expensive tie-up to achieve, but if you have an 8-shaft loom then you should have enough treadles for 4-shaft double weave and this tie-up is incredibly versatile.
8-treadle tie-up for a countermarche loom
The basic principle is still to divide the treadles into two groups, with one group for each layer. In this example for the parallel threading, treadles which operate shafts 1 and 2 only operate shafts 1 and 2 and are not tied up to shafts 3 and 4 at all. This means you always need to depress two treadles for each pick, so that all four shafts are activated.
As above, I have coloured in some of the squares: these indicate which shafts are tied up to rise. Shafts which are tied up to sink are marked with an X on a white ground. So both treadles 1 and 2 are tied up to shafts 1 and 2, but treadle 1 will raise both shafts while treadle 2 will lower both shafts. Treadle 3 will raise shaft 1 and lower shaft 2, while treadle 4 does the opposite: it will lower shaft 1 and raise shaft 2.
Treadlings for layer exchange on a countermarche loom
Every row in these treadlings contains both a W and an L, since a weaving treadle and a layer-manoeuvring treadle are needed for every pick.
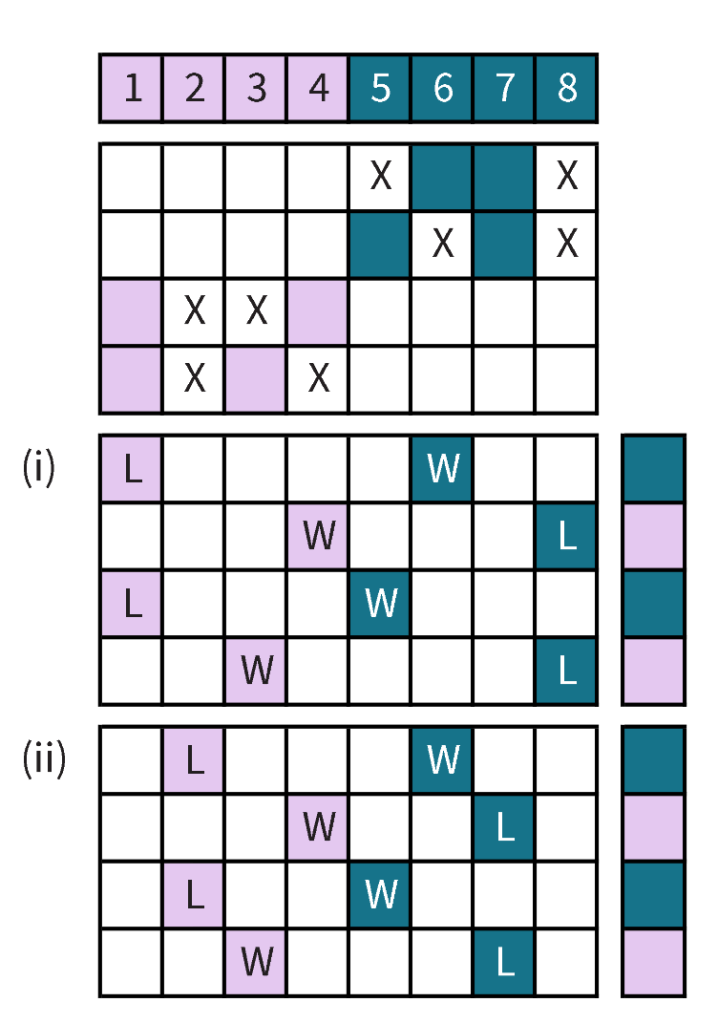
For instance, in treadling (ii) we are putting layer two – my teal layer – on top. Whenever we are weaving layer one (i.e. on picks one and three) we also need to raise layer two out of the way, just as we would on a jack loom. In addition, though, whenever we are weaving layer two (on picks two and four) we also need to lower layer one out of the way. There’s a nice symmetry to the process!

First posted on weavingspace.co.uk © Cally Booker

Hello All! Thank you very much for your countermarch double weave tie-up explanation. I’m going to have to read it a few more times until I really understand it as I’m just a beginning weaver. I get the basics, but this is a wee big outside my comfort zone so I really appreciate all the help. And with this COVID lockdown getting together with an instructor is difficult. I hope everyone there’s well and thanks again for all your help!!!
Hi Jon, glad to hear that it’s a useful post! I wove on a countermarche loom for many years, and it does take a bit of thinking to get set up. But once you are at the loom with your feet on the treadles, the lifting starts to make sense and you can really get creative with the possibilities!