Double weave can take us in many different creative directions and one of the most exciting is the possibility of weaving a three-dimensional structure in a single piece. We can start on four shafts, using the threading and liftplans (or tie-up) we’ve discussed already to weave a simple tube.
Setting up a tubular weave on four shafts
I could use either the divided parallel or the straight threading, and I am going to stick to the parallel option. In fact, I generally find that’s a good option for thinking about tubes, as we’ll see. Rather than thread my two contrasting layers, however, I am going to make my whole warp pink for now.
Since the two layers are the same colour, it doesn’t really matter which one is on top. I will pick the liftplan which puts the layer on shafts 1 and 2 on top. The only change I need to make to create a seamless tube, is to weave the whole cycle with a single shuttle. The weft will spiral around the weave: over the top, back along the bottom, around and around.
The problem
Unfortunately, all is not quite sunshine and flowers. Let’s take a closer look at how the interlacement will work in practice.
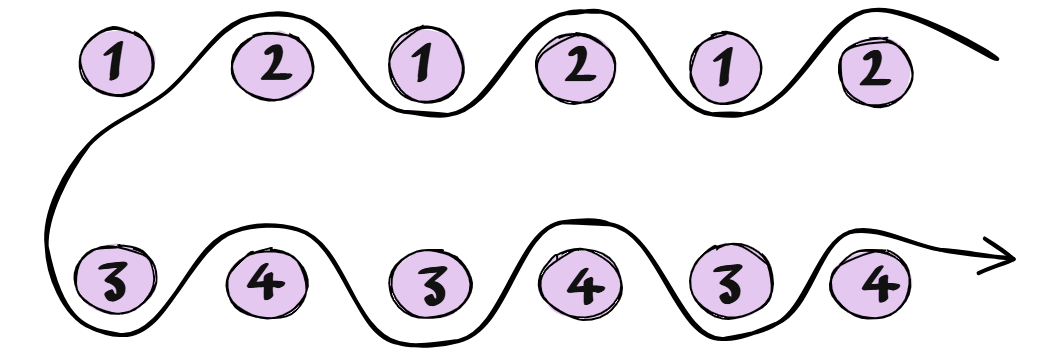
For my first pick, I’m raising just shaft 1, so the weft travels across the top layer. On the return pick, I’m lifting shafts 1 and 2 out of the way and raising shaft 3 to weave the bottom layer.
So far, so good.
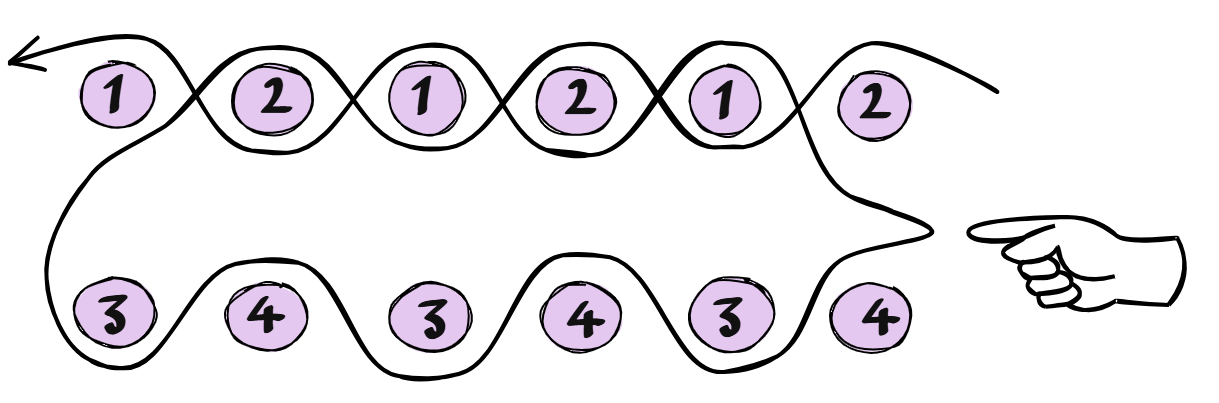
When I start the third pick, however, I am going to raise shaft two and reinsert the shuttle into the top layer. As we can see in the sketch, that means my weft is going to be pulled back in and miss the rightmost warp ends in both layers.
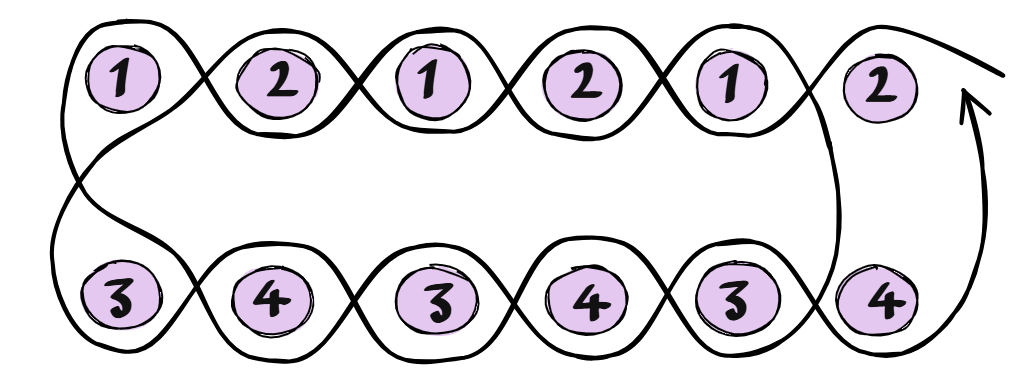
And the second circuit doesn’t improve matters. I’ve now completed all four picks, so my weft will go back into the top layer along my original path, catching those two edge threads in a pocket together.
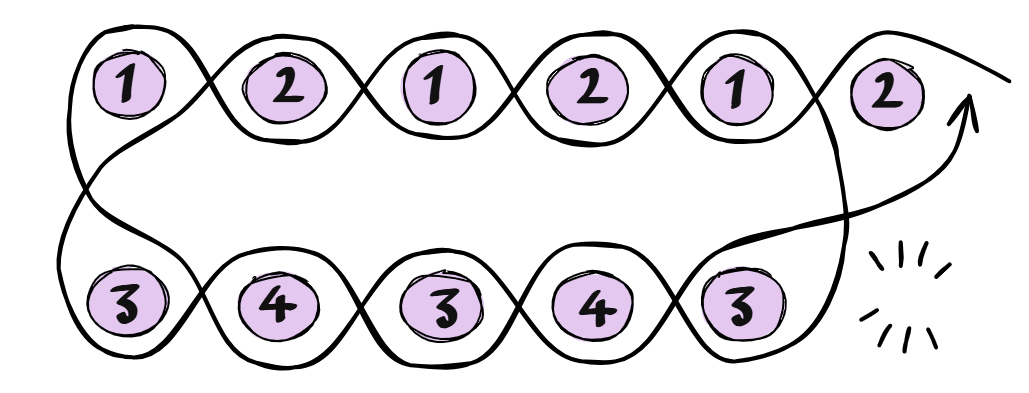
This is, in fact, inevitable. If you start your shuttle from the right, as I do, then the doubled end will appear on the right. If you start your shuttle from the left, then the doubled end will appear on the left.
When I chose the threading for this notional warp, I set it up as I normally would for double cloth, where each end in one layer is paired with an end in the other. This means it is bound to have an even number of ends in total. However, for a seamless tube, we need an odd number of warp ends in total.
The solution
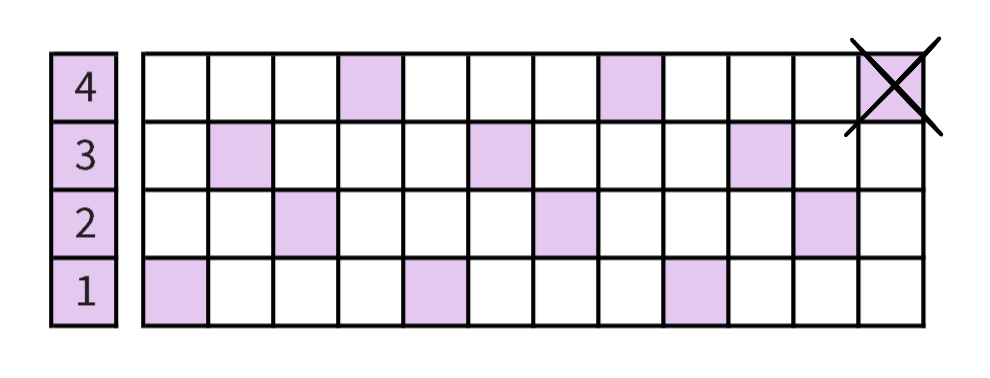
It is very easy to fix: cut one warp end out.
As I want to start from the right, I will remove the rightmost end, i.e. the one on shaft 4. If you prefer to start from the left, you’ll want to remove the leftmost end, i.e. the one on shaft 1.
My threading now looks like this:
In practice, I would normally make a warp with an even number of ends anyway, since that is easier to handle, and then just leave one end unthreaded. Having it there at the back of the loom also gives me the option to switch to a different kind of double cloth project later on if I want to.
More shafts, more layers: a double tube construction
If I can weave one tube on four shafts, then with eight shafts I can weave two! In fact, every pair of shafts I add allows me to weave one additional layer, and I can join those layers in all sorts of different ways, but for now I am going to focus on weaving a pair of tubes which are nested one inside the other. This sounds like rather a niche construction, but is actually very practical. It allows us to weave, for example, a bag with its own lining, using the exchange of layers around the exterior of the bag to create pattern or even functional features such as a tube for a drawstring.

This wool laptop case is an example of a double tube woven on eight shafts. The project details and construction process are given in my book, Designing and Weaving Double Cloth.
Let’s say I want my pink double cloth tube to be the lining for a teal bag. I can add another two warp layers on shafts 5 – 8 and sketch out a structure something like this:
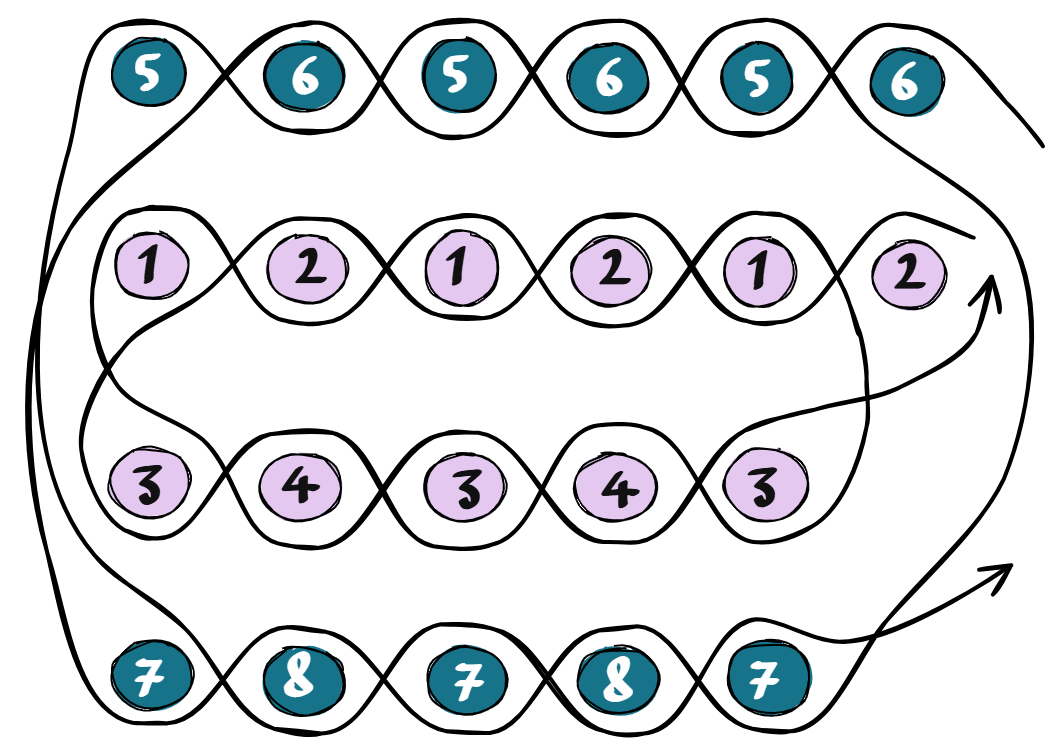
Note that the outer tube, like the inner one, needs to have an odd number of ends, so I have omitted the rightmost end which would have been on shaft 8.
In my sketch the weft at the outer edges looks very long and loose, but that’s just an artefact of my diagram and not of the weave itself!
Sketching out a diagram like this can be really useful when you are working with multiple layers. I find it helpful to be able to visualise where each layer is going to be in relation to the others, and what path the weft (or wefts) needs to follow.
Another useful view is one from the side. For instance, if I want to use this woven fabric to make a bag, I need to make sure that I keep the centre open, and only make exchanges that won’t interfere with that. In the diagram below, I have sketched a series of exchanges between the two upper layers and the two lower layers that will achieve this aim.
In this diagram, each pink or teal line represents one layer of the cloth seen from the side of the loom, so the lines are running in the warp direction. I have made a note at the left hand side of which shafts each layer is threaded on. If we took a cross section at the point marked A, we would see something like the interlacement I sketched above. The teal tube is on the outside, with the layer on shafts 5 & 6 at the top. The pink tube is on the inside, with the layer on shafts 1 & 2 at the top. I’ve drawn another vertical line at B, where the cross section would look different. Now the pink tube is on the outside and the teal tube inside, but note that the space between the second and third layers in the stack remains open, so the double tube as a whole remains open.
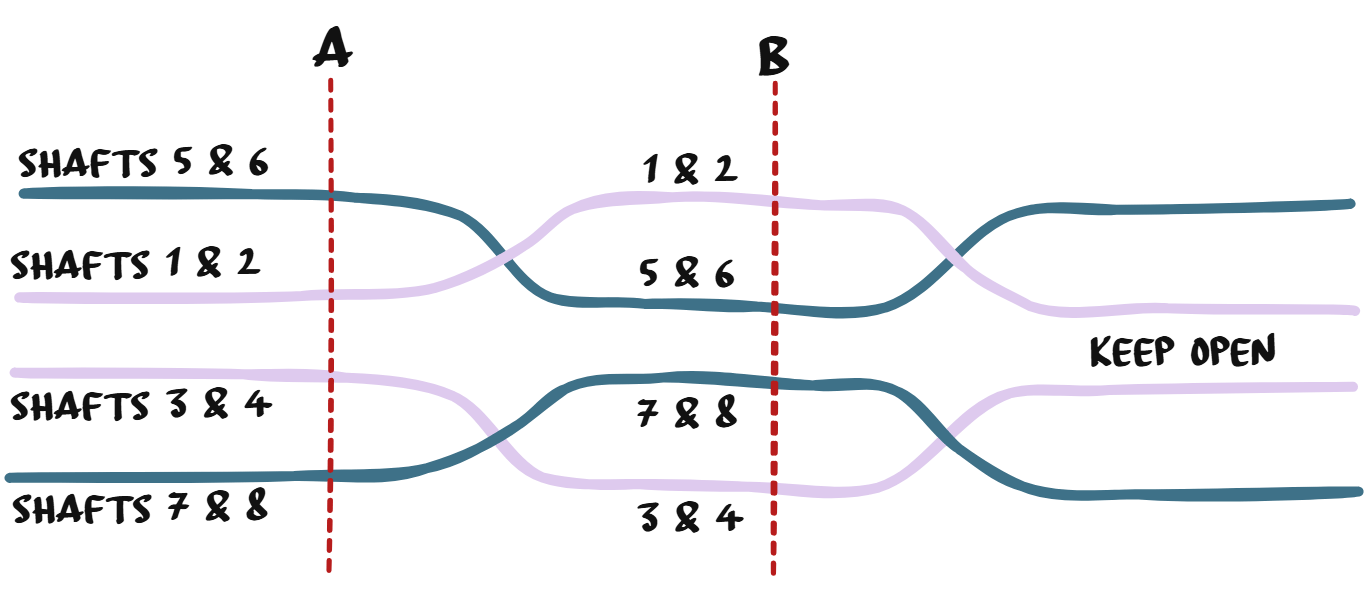
Although this longitudinal sketch is simple, it tells me everything I need to build the liftplans for this structure. I know that my layers will be woven in plain weave, and I know exactly where each layer needs to be in relation to the other three, and those are the elements that determine which shafts I need to lift.
Turning a sketch into a liftplan
I tend to start with the weaving elements, and then add the layer-lifting.
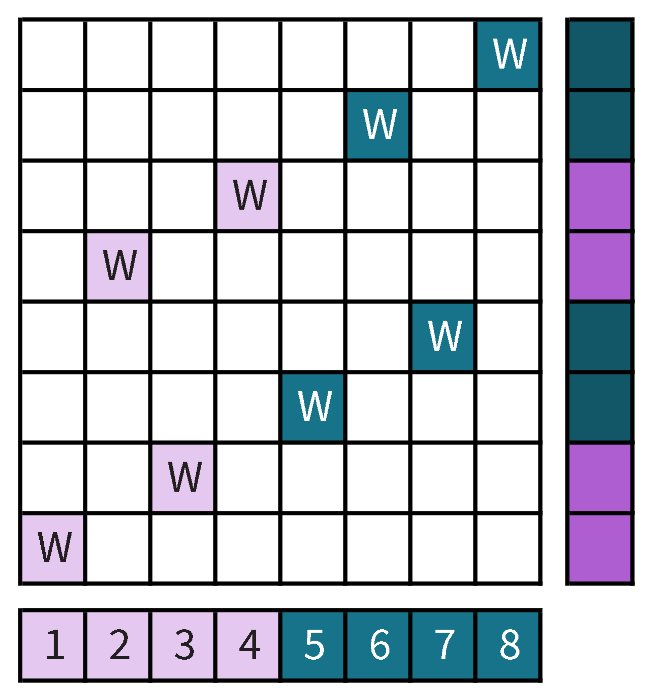
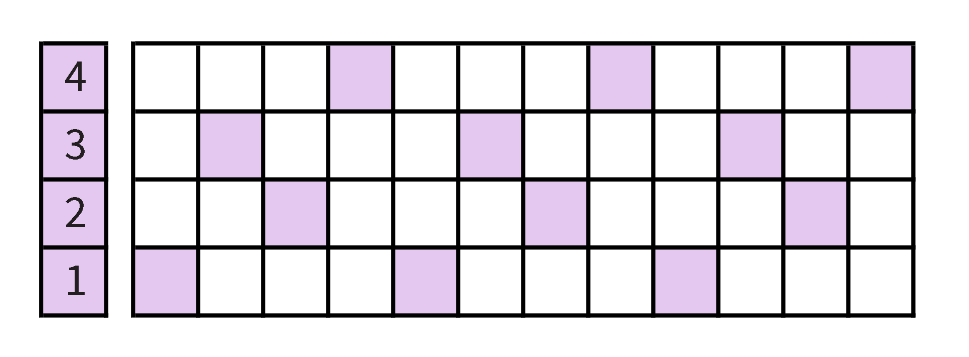
As is my usual preference, I am going to start with the odd shaft in each layer, so on the first four picks I will raise shafts 1, 3, 5 and 7 in turn, and then on the next cycle will raise the even shafts. In eight picks I will have completed the plain weave interlacement in all four layers.
Note that I have planned two picks per tube at a time, i.e. across and back, which keeps the shuttle handling smooth and easy.
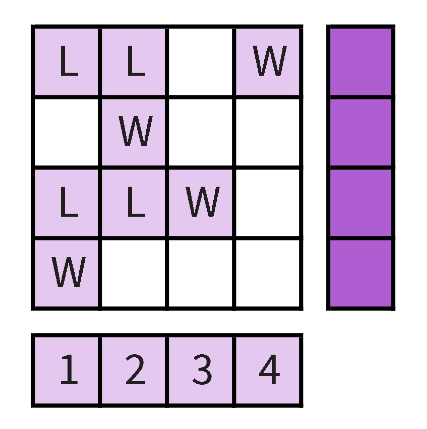
Now let’s work our way down the layers in cross section A from top to bottom.
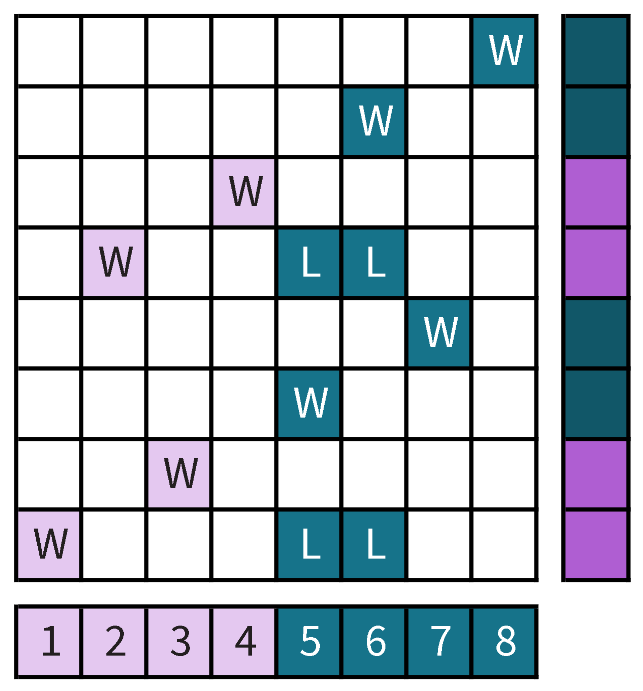
The layer on shafts 5 and 6 is on top, so when I am weaving that layer — on picks 3 and 7 — no other lifting is needed.
The next layer is on shafts 1 and 2, which is woven on picks 1 and 5. When I am weaving this layer, I will need to lift the top layer out of the way, so I will add L to each of shafts 5 and 6 on these picks.
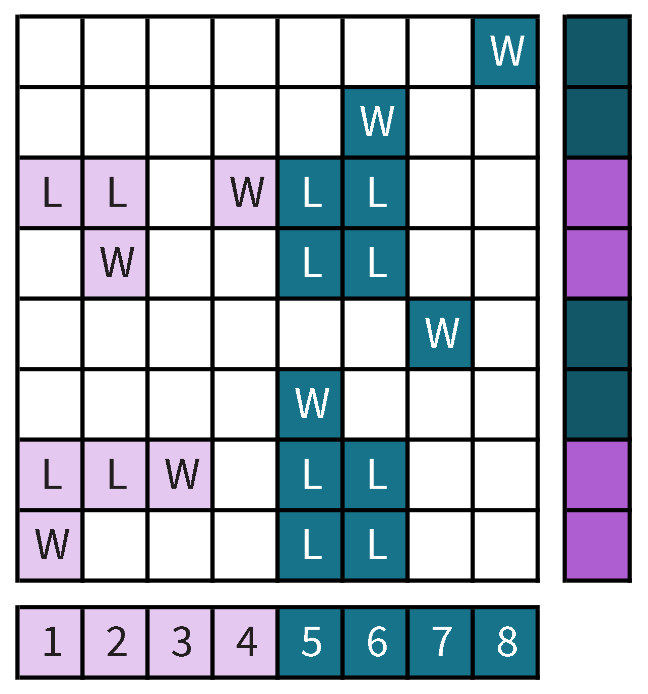
The third layer down is the pink layer on shafts 3 and 4, which I am weaving on picks 2 and 6. To get to this layer I need to lift both of the higher layers out of the way. I will add L to each of shafts 1, 2, 5 and 6 on these two picks.
You know the drill now! The layer on shafts 7 and 8 is right on the bottom. Whenever I am weaving this layer — on picks 4 and 8 — I need to lift all three of the other layers out of the way, so I add the necessary Ls to shafts 1 – 6.
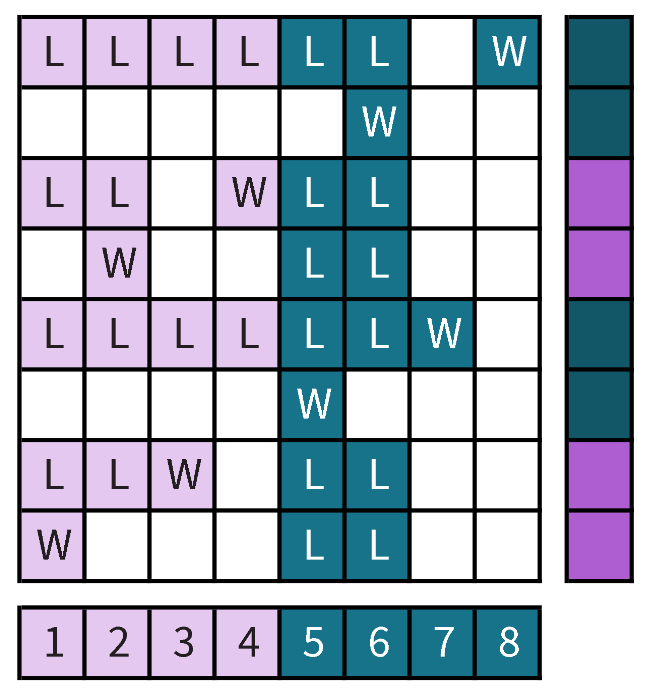
You may have noticed that we were able to work out all this detail without ever writing out a precise threading. But we should have a threading, so here is one possibility. Don’t forget that we need to drop one end from each tube.

To be honest, if I were going to wind this warp all as one, then I would probably revise my threading and shaft assignment to alternate the colours. However, when there are four layers to be woven, the sett is going to be seriously dense. I would tend to wind two separate warps, combining them on the warp beam, but using one set of lease sticks for each warp. In that case, threading two and two is probably going to be a wee bit quicker.

First posted on weavingspace.co.uk © Cally Booker


