In this post I will look at two different threadings which allow you to weave double cloth on a 4 shaft loom. You will find both of these approaches in the weaving literature. They achieve exactly the same result, but it is useful to look closely at how they do this.

The starting point
If you are weaving on a shaft loom, you know that it takes two shafts to make plain weave. To make double cloth we simply add a second layer of plain weave threaded on another two shafts, taking our total to four shafts. In practice this usually entails making one big warp, with twice as many ends as usual, and these ends usually alternate – one from layer one followed by one from layer two – all the way across the cloth. We just need to decide which shafts we are going to use for each layer.
Which shafts to choose
There are two main approaches to assigning your shafts for double weave: the straight threading and the divided parallel threading.
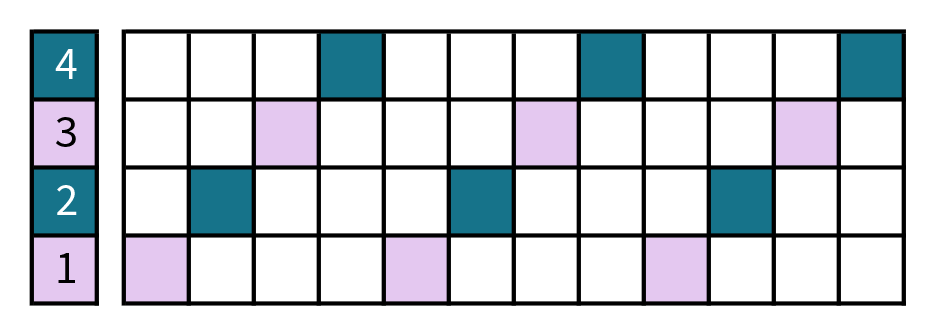
Straight threading: odds versus evens
This threading is simply a straight draw, with one layer threaded on the odd-numbered shafts (1 and 3) and the other on the even-numbered shafts (2 and 4). For this reason, I tend to characterise this approach as odds versus evens, and I usually think of the layer on the odd shafts as ‘layer one’ while the other layer is ‘layer two’. The threading draft looks like this:
The straight threading has some important points in its favour, and I will just highlight a couple of them here.
One is that a straight draw is just about the easiest draft to thread. You have probably used this threading before for weaving other structures, so the only thing that you need to watch out for is making sure that you get the right colour on the right shaft. Reading from the right, I need to maintain a teal-pink-teal-pink alternation as I proceed. This is something which you can build into your warp-winding process (you can see a post demonstrating how I wind a warp for double weave here).
Another advantage of the odds vs evens principle is that you can very simply extend it to whatever number of shafts you have available. If you have eight shafts, then 1 and 3 can be extended to 1, 3, 5 and 7, while 2 and 4 becomes 2, 4, 6 and 8.
Given that it is so easy, why would you ever think of doing anything else?
Divided parallel threading: front and back
Here’s an alternative to consider. I charactise this threading as front and back because it involves threading one layer on the frontmost shafts (1 and 2) and the other on the shafts at the back (3 and 4). The individual layers look like this:

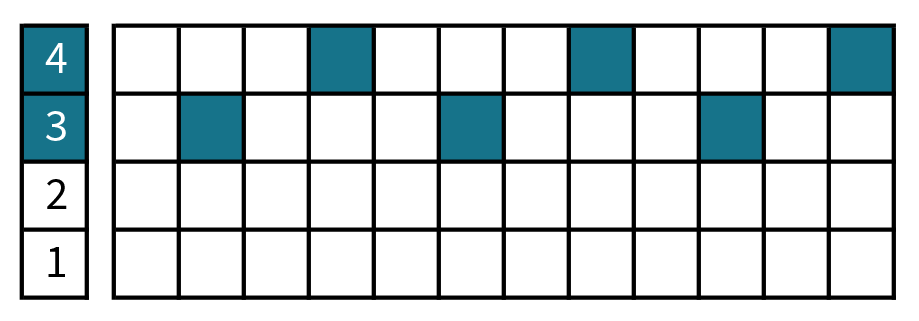
So, when we put them together, the whole threading looks like this:

Reading from the right, I am still threading teal-pink-teal-pink as before, but now instead of the straight draw I am threading on shafts 4-2-3-1.
An important point to note about this approach to threading is that, as you increase the number of shafts you are using, the choice of shafts for each layer may change depending on your design. On eight shafts, for example, you might use all of shafts 1 – 4 for one layer, and assign shafts 5 – 8 to the other.
What they have in common
An important thing to note about these drafts is that both are threaded in a 1:1 ratio. That is, every thread from one layer is followed by a thread from the other layer. This is based on the assumption that both layers will be woven with the same thickness of yarn, which is a good starting place for weaving double cloth.
Another key feature is that both drafts assign teal threads to two shafts and pink threads to the other two shafts: there are no shafts shared by both layers. We could turn the divided parallel threading into the straight threading simply by exchanging shafts 2 and 3.
Choosing a threading
You will come across both the straight and the divided parallel threading in the literature on double weave, so it is a good idea to get to know and recognise them. I find that each one has its strengths and that they tend to suit different contexts, so I use both in my own weaving practice. It isn’t necessary to do this, but I do find that being flexible in the way I tackle double cloth projects has been a huge help in developing my understanding of the underlying principles.
I have already outlined some advantages of the first option, but what about the second?
The main advantages of dividing the shafts into front and back come after you have finished threading. To make plain weave in layer one you will need to raise alternate shafts. If layer one is threaded on the odd shafts, that will mean alternating shafts 1 and 3. If layer one is threaded on the front two shafts, that will mean alternating shafts 1 and 2.
When it comes to making plain weave, alternating odd and even shafts is something that is very familiar and which the experienced weaver can do almost without thinking. If we choose the divided parallel threading, we build that familiar odd-even rhythm of plain weave into our double cloth setup, which (i) frees up a few brain cells to focus on the other aspects of weaving double cloth and (ii) makes it easier to create new lift combinations on the fly. I’ll come back to these points in future blog posts.
It’s also worth noting that if you are weaving on a table loom which has the levers facing you in a row at the front, then assigning each layer to a pair of adjacent shafts means that you can easily raise or lower the whole layer in one go. This advantage is increased the more shafts you are using. A block of four shafts together (for one layer of an 8-shaft double weave) can be easier to work with visually than four shafts which are spread out.

The divided parallel threading will therefore be the basis of my next few posts. However, if you prefer to thread a straight draw and work with odds versus evens, then you can easily make the shaft switch I have described. (Fiberworks Silver weaving software even has a tool which allows you to move shafts around at your leisure: look for something called a shaft shuffler in your menu.)
Coming up…
We’ll continue with the basics of weaving double cloth on four shafts for the next few weeks. Do let me know if you have any questions!

First posted on weavingspace.co.uk © Cally Booker


